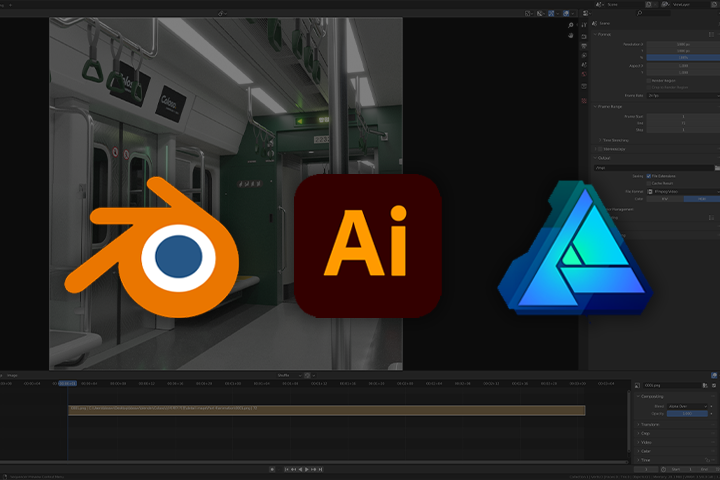
BlenderArtists,DrHuchu_블렌더아티스트 후추박사 Details
Class introduction
introduction video
Blender Artist, Dr. huchu
“Learn photorealistic techniques that can be applied to various fields such as games, illustration, and package design with the free tool Blender.”
The ultimate in detail, know-how to produce photo-realistic images that look more like photos than photos.
Do you want to incorporate a photo-realistic background into your illustration or express realistic textures in your mock-up work?
Photorealistic techniques are applied in various fields such as games, illustrations, and package design!
Blender, which has the advantage of being a free tool while being able to implement photorealistic textures in detail, has been in the spotlight recently.
In this class, anyone can easily get started with Blender with step-by-step difficulty levels ranging from modeling, shading, texturing, and rendering of the props that make up each scene.
Discover the know-how of Dr. huchu, a photorealistic background modeling expert who provides various tutoring for illustrators and package designers.
Dr. huchu's portfolio stands out for its detailed descriptions and realistic presentation.


Why Take This Class?
Are you worried that you will only complete the results for lectures and not be able to apply them to your most important work?
In this class, we do not simply end up producing the same results as the examples, but rather allow students to use what they have learned in practice.
In addition to the option values covered in the examples, we will also inform you of frequently used details.
Coloso is the only photorealistic background modeling class that takes responsibility for improving your skills after taking the class.
In this class, you can complete two final background scenes by creating various examples.
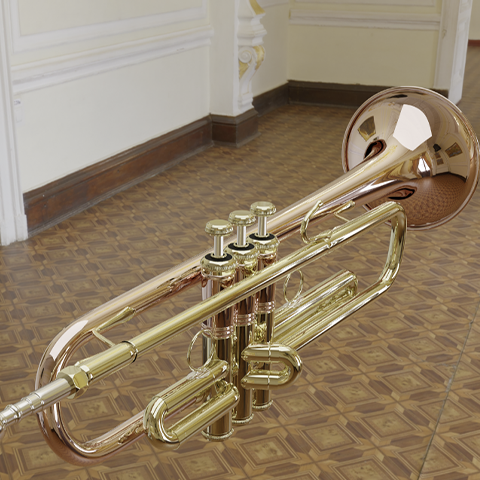
Part 01. Simple object creation
-
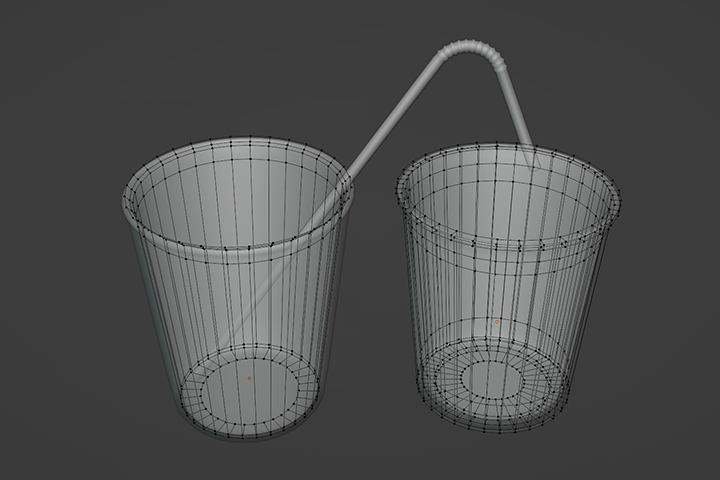
basic cup -
deepening cup -
straw cup -
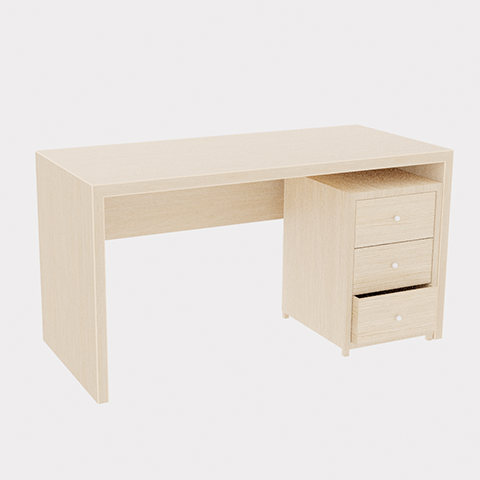
table -
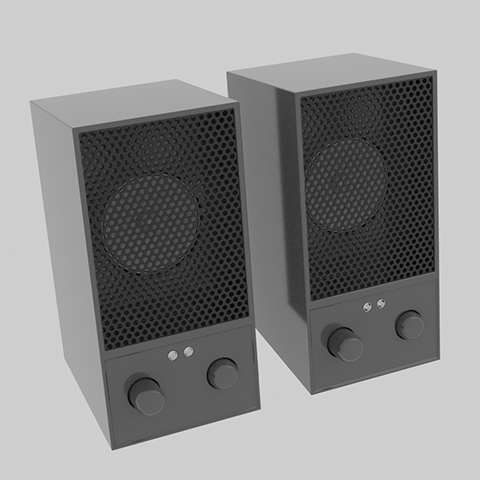
speaker
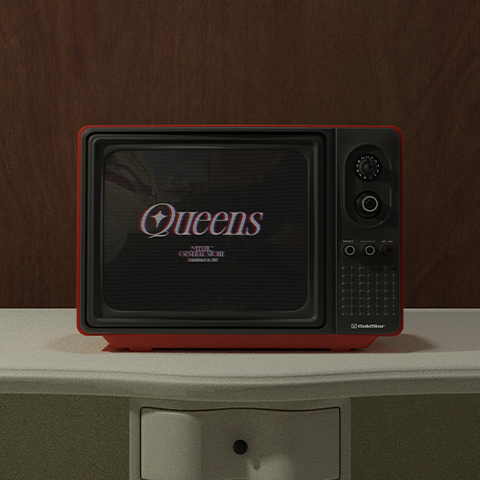
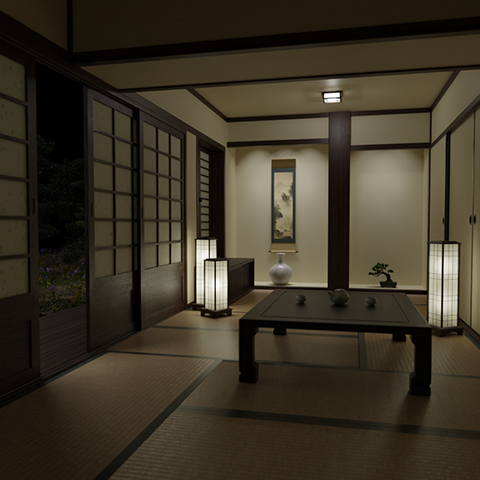
Part 02. Scene composition using objects
-
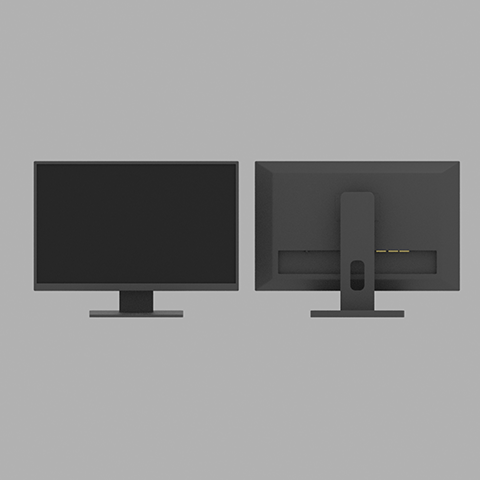
monitor -
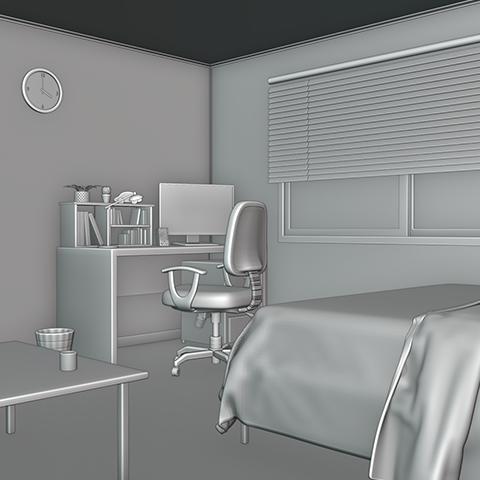
furniture and props -
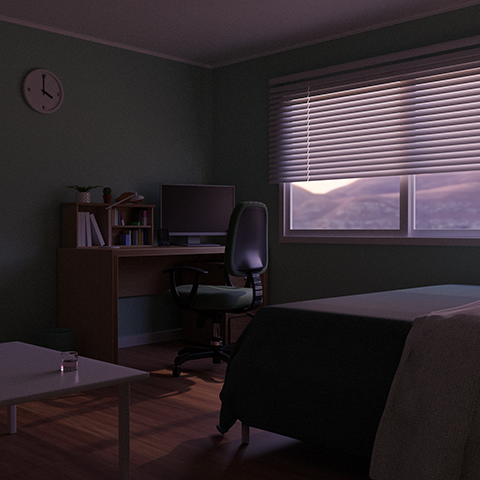
room rendering -
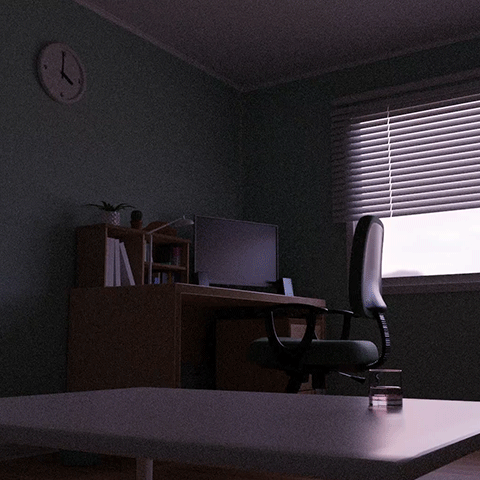
animated movie
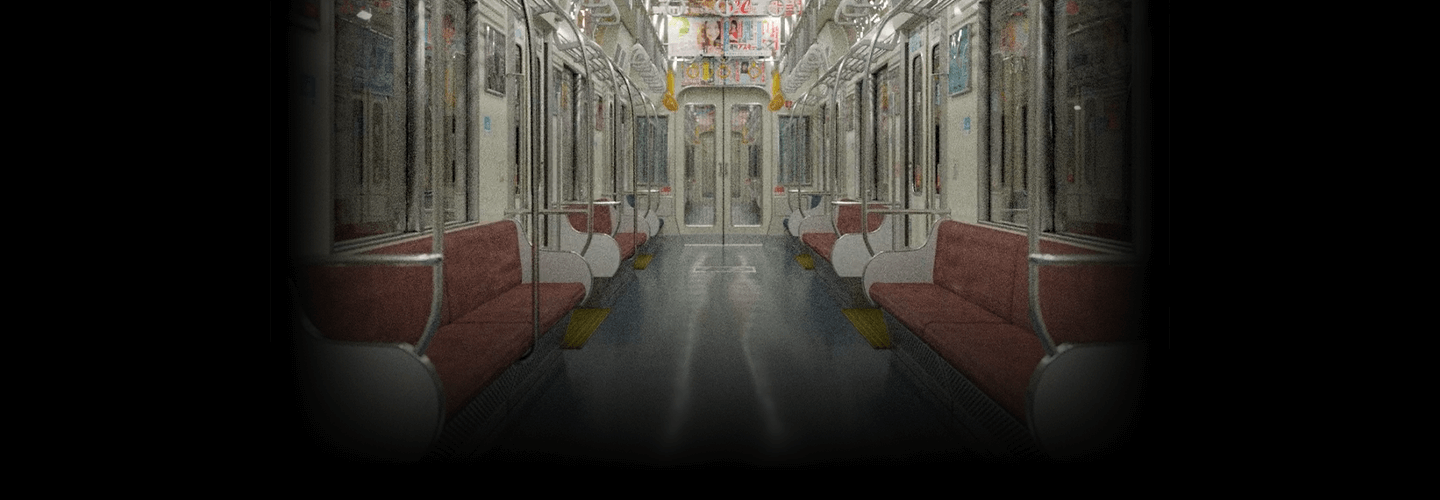
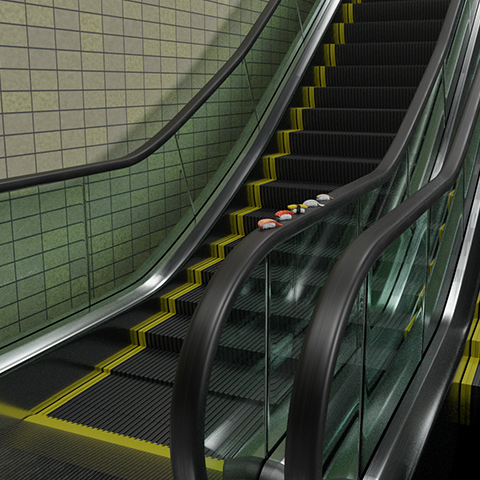
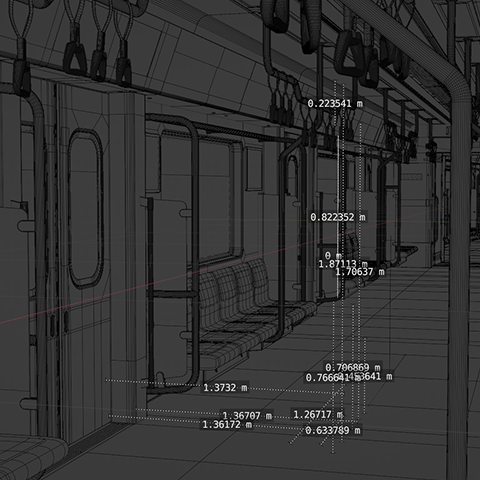
Part 03. Subway scene composition
-
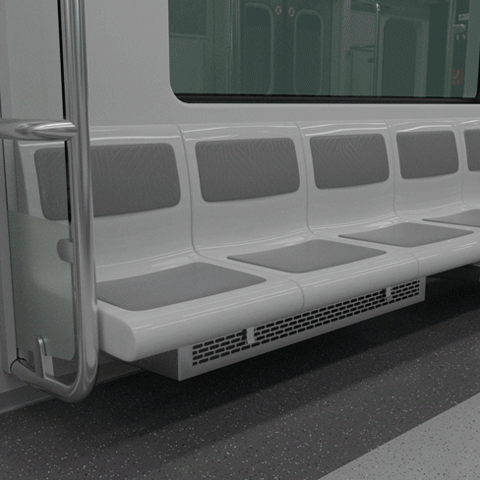
seat -
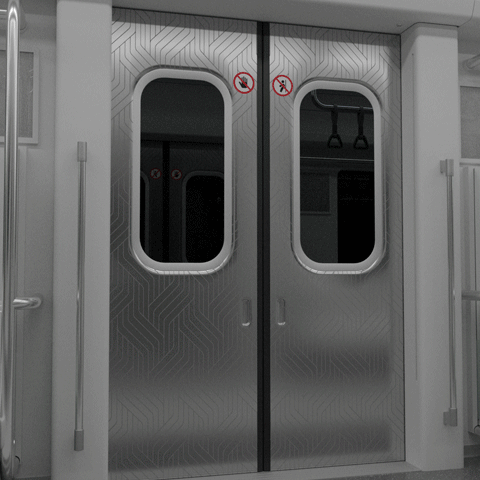
Entrance -

Floor and connecting passage -
Final scene completed
* This image is an example image to help you understand the class.
Speaker introduction
blender artist
Dr. huchu
hello. I am Dr. huchu, a blender artist who started using blender as a hobby and currently provides private tutoring and outsourcing work as a freelancer.
I mainly work on constructing various objects and spaces where they are gathered, or realizing actual places in 3D.
In this class, we will provide you with detailed information on how to overcome difficulties through various experiences while self-teaching photorealistic background modeling.
Rather than explaining functions just for creating examples, we will cover options for each function and various approaches to help you create something yourself.

Dr. huchu
Current) Blender Artist
History and experience
Previous) Mock-up modeling lecture for package designers
Background modeling lecture for illustrators
class features
class features
Photorealistic rendering with vivid details
Do you want the realism of encountering a real photo? Learn photorealistic techniques by creating each detail yourself to create realistic results.
Various approaches available when creating objects
Even when creating just one object, you can use a variety of approaches. Understand the various approaches needed to create objects, find a method that suits your style, and connect and utilize it when applying it to other objects.
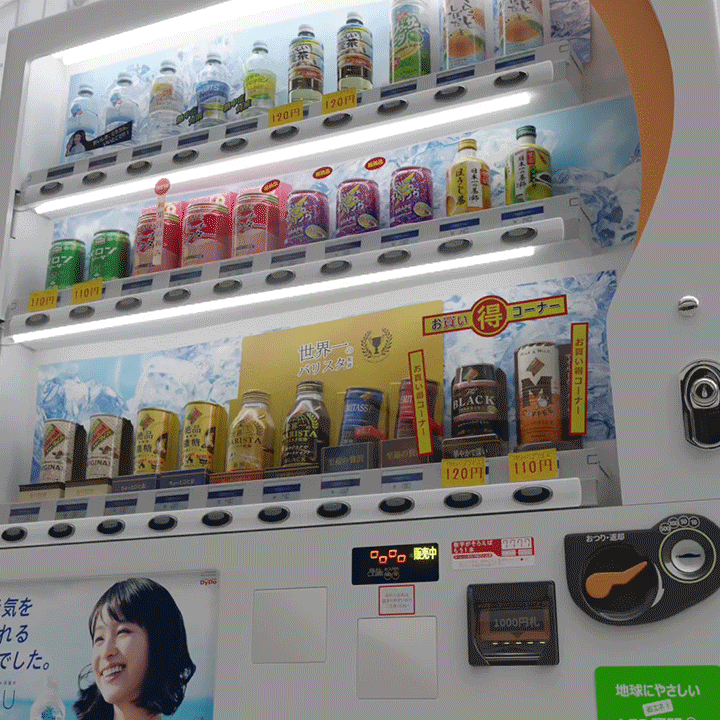
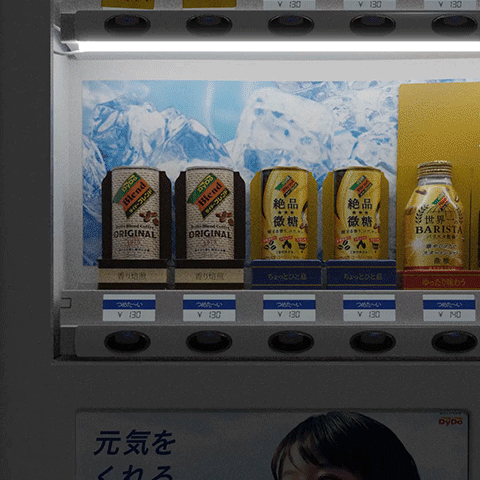
Provides approximately 70 types of lecture materials for photorealistic beginners
Approximately 70 types of rich lecture materials, including blueprint images for each object, reference images and figures needed for modeling, high-definition vector textures, and editable AI files, are provided as a special benefit to all students!
Class composition
learn this
-
 Blender introductory knowledge learned step by step from the beginningYou will learn step by step how Blender is used and how to use each function, along with a basic explanation of how to use each function to create objects.
 -
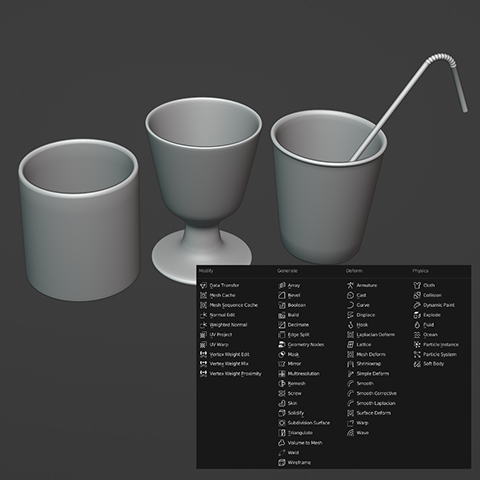 Learn modifiers by creating simple objectsBy creating objects that can be easily seen around you, you will learn frequently used modifiers and see what shapes each modifier is useful for in the future.
 -
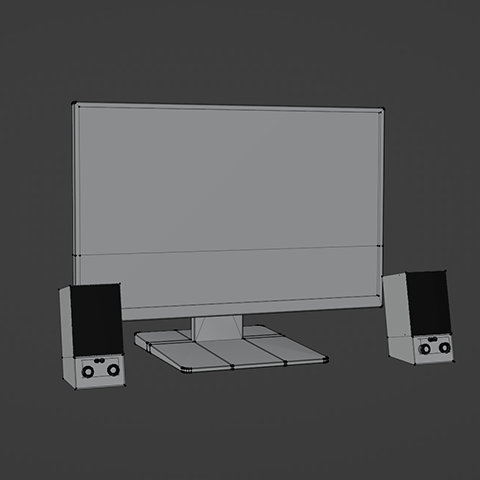 Review core functionality by creating complex objectsCreate objects of a more advanced level of difficulty, such as monitors and various furniture, and challenge yourself to configure and render dense scene lighting using add-ons and free assets.
-
 How to create photorealistic objects and scenesBased on actual figures, we create a scene by modeling it close to the actual shape, expressing realistic textures as if taken from a photo, and even configuring lighting similar to the real thing.
 -
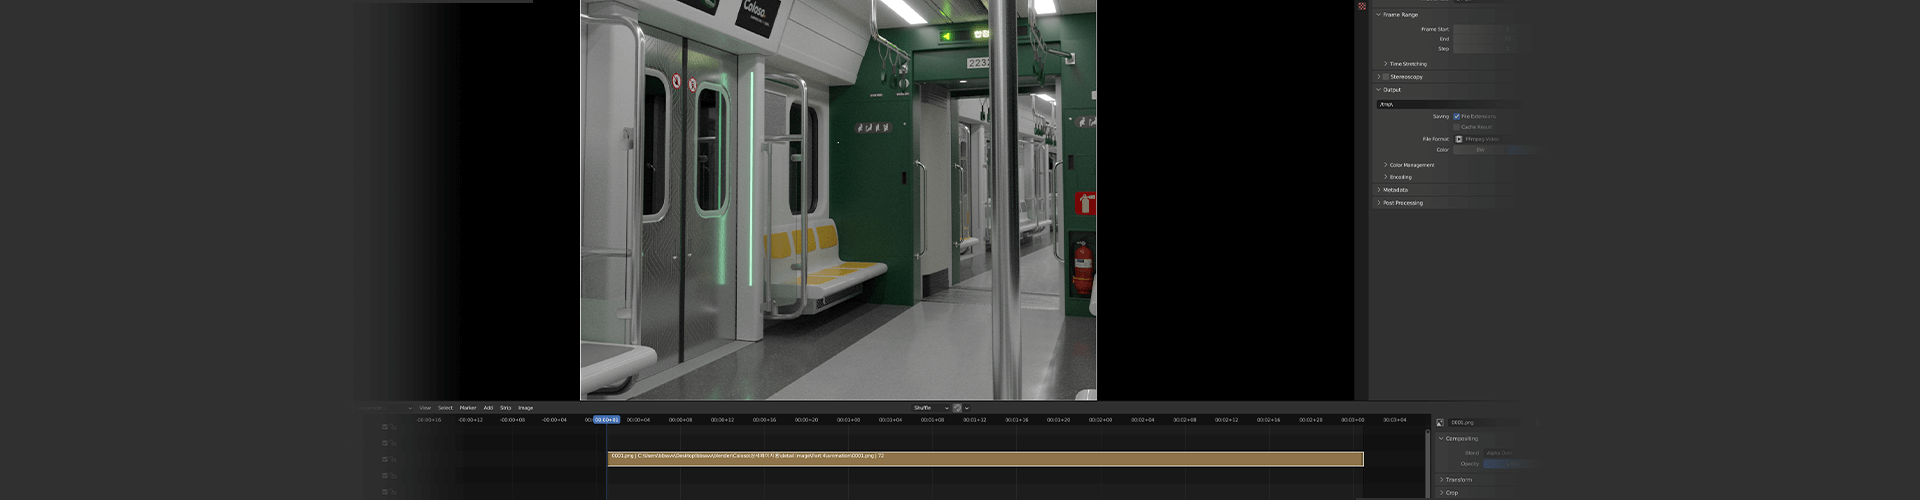
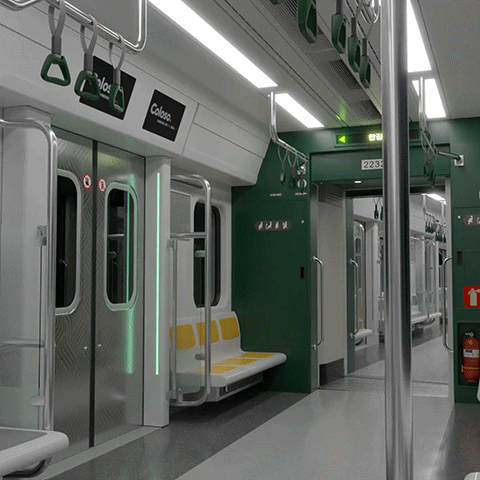
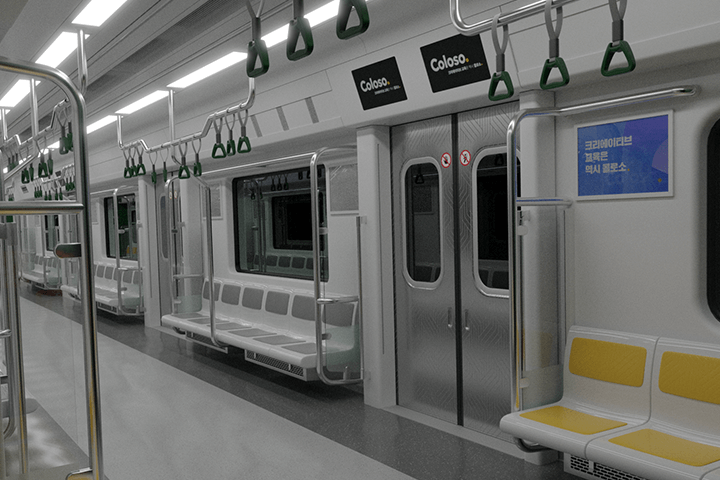
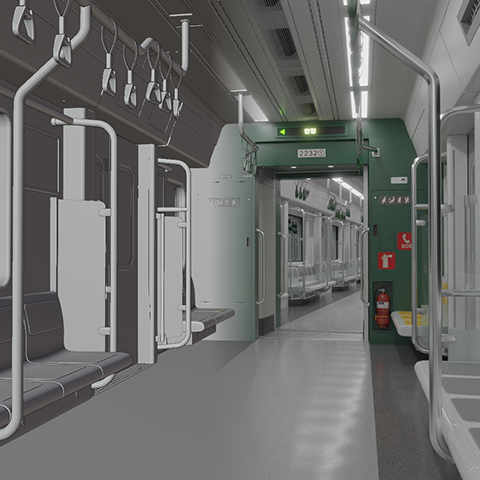 Creating subway interior scenes with outstanding detail and densityWe create various components based on references such as seats, poles, handles, windows, and screens, and ultimately complete the background scene of one subway car.
 -
 High-definition textures that you can create and use yourselfCreate high-quality image elements that are difficult to find through searches using vector drawing programs such as Illustrator and Affinity Designer and apply them to modeling.
* This image is an example image to help you understand the class.
curriculum
curriculum
Show me the curriculum
SECTION 01. Introduction and preparation steps for blender
01. Orientation
- Self-introduction and understanding of Blender
- Rough workflow/curriculum guide
- Install and prepare your blender
SECTION 02. Basic usage of blender
02. Blender’s basic UI and functions
- Blender UI and basic functions explained
- Basic functions including adding, moving, resizing, and rotating meshes
SECTION 03. Basic modeling using modifiers
03. A brief explanation of the modifier and making a basic cup
- The concept of modifier
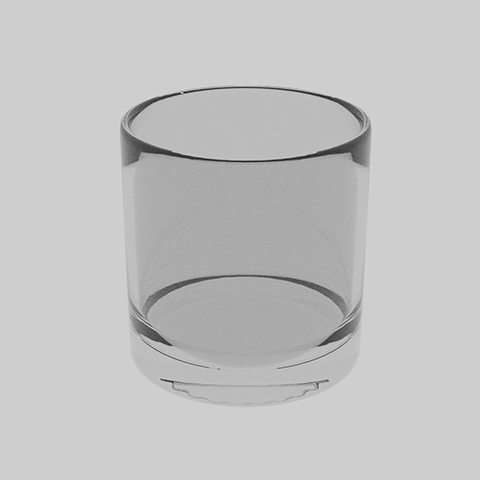
- Basic cup modeling using basic functions
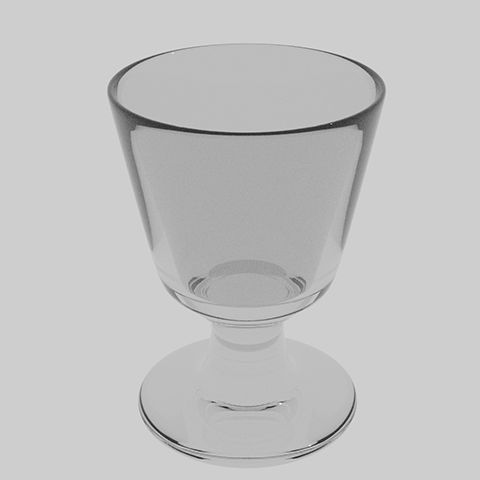
04. In-depth on-the-rocks glass modeling using various methods
- How to make it using edge loop and scale
- Description of subdivision surface modifier options
- How to use extrude and scale
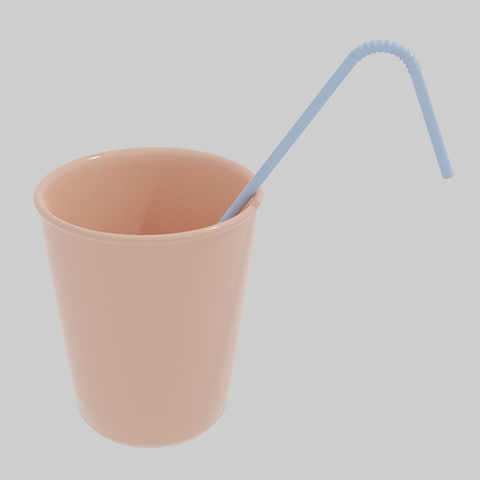
05. Cup and straw modeling using modifier
- How to create using solidify and subdivision surface
- straw modeling
06. Table modeling
- Create it using the mirror modifier
- Description of option values of mirror modifier
07. Speaker modeling
- Detailed options for inset faces
- Description of the boolean modifier
- Easily use boolean modifier using the bool tool add-on
- Cut the bottom surface with the knife tool
SECTION 04. Apply shading, texturing, and materials
08. Principled BSDF, Blender’s basic shader
- Principled BSDF shader’s characteristics and direct application of each option value
- Express simple textures such as metal and glass
09. Procedural texturing using the node system
- Description of shader editor
- Connect a few nodes directly
- Create a brick wall by mixing nodes such as texture, converter, and normal.
10. Texturing using external images
- Where to get image textures for free
- color map, diffuse map
- roughness map, glossiness map
- bump map, normal map
- displacement map
- Adjusting image texture through uv mapping
- Simple image modification and use using nodes
11. Adding material to the object created earlier
- Cup object > glass
- Table object > Tree (UV mapping)
- Speaker > Metal, Plastic
SECTION 05. Making complex objects
12. Monitor modeling Part 1
- Modeling based on actual numbers
- Try the bevel modifier and edge bevel
- About the topology of squares and ngons
13. Monitor modeling part 2
- Modeling using the modifier functions learned earlier
14. Monitor Shading/Texturing
- Adding texture using the Principled BSDF shader
- How to express printed parts as materials on the surface
15. Surrounding scene composition and lighting
- Create a background with a plane
- Brief description of ight objects / description of setting values
- Add lighting to the scene with point lights
16. Rendering
- Settings/operations for camera object
- Browse and set render properties
- Browse and set output properties
- Try rendering yourself
SECTION 06. Gather the created objects to compose a scene
17. Learn how to import previously created objects
- How to import a pre-made object using link
- How to retrieve a pre-created object using append
- How to import pre-made objects using the asset browser
18. Making surrounding furniture and accessories Part 1
- Frame your room
- Import existing objects with append
- Dresser modeling/texturing
19. Making surrounding furniture and accessories Part 2
- Bookshelf and book modeling/texturing
- floor molding modeling
- window frame modeling
20. Making surrounding furniture and accessories Part 3
- Window/blind modeling
- Ceiling molding modeling using curves
- Trash can modeling/shading
21. Making surrounding furniture and accessories Part 4
- Making stand lights, clocks, and low tables
- Creating floor linoleum texture using procedural texturing method
22. Asset placement, scene lighting setup and rendering
- Using free assets using blenderkit add-on
- Setting up natural lighting and scenery using HDRI
- Setting the color coming from outdoors with a sun light object
- Camera composition settings and rendering settings/rendering
SECTION 07. Create a high-density scene
23. Explore references and create bases and seats
- Explore information on the web
- Actual figures and images from various angles
- Create a single base
- making seats
24. Building the heater underneath the seat and the structure on the side.
- Building the heater frame and handle clips
- Building rods and glass structures at both ends of the seat
25. Completing the seat side rods and structure / making the center rod
- Making clamps for the seat side glass structure
- Making the seat top bar
- Making a seat center handle holder rod
26. Making seat handles and windows
- Create a topology to preserve the angle at the desired location
- Making a strap using curves
- Create window frames, moldings, and glass windows by removing parts of objects.
27. Making an entrance door
- Use the mirror modifier to have the same shape on both sides
- Create a natural frame by removing part of an object
28. Creating protrusions on both sides of the door and top screen
- Making an emergency handle for the door next to the protrusion
- Create a top screen section
29. Create billboards on both sides of the window and an area above the seats.
- Make a framed billboard
- Create an upper seat area using the sides of the screen
- Making an air purifier above the seat
30. Making a magnet for the elderly
- Creating wall-to-ceiling connections
- Dividing and expressing ceiling sections
- Convincingly depicting the interior of an air conditioner that is hard to see
31. Implementing floor texture
- Making a magnet base for the elderly and reducing the width of the window
- Import and modify senior citizen seats and glass structures
- Modify the top bar
32. Creating a wall connected to the middle passage
- Create a wall connected to the middle passage next to the elderly seat.
- Expressing parts with different external and internal curvatures
33. Creating a middle passage
- Making the middle passage part connected to the next vehicle
34. Overall layout and scene composition
- Construct a scene without being heavy using instances
35. Finalize placement and scene composition, apply materials
- Finalizing the placement and configuration of the ceiling
- Adding simple scene lighting using the emission node
- Add material using principled BSDF shader
36. Creating various materials with procedural texturing
- Add material using principled BSDF shader
- thin plastic texture
- Creating window tinted glass material
37. Finish creating the material with procedural texturing and add missing elements
- Create materials with unique floor patterns and curves
- Creating a lock at the top and a step in front of the door
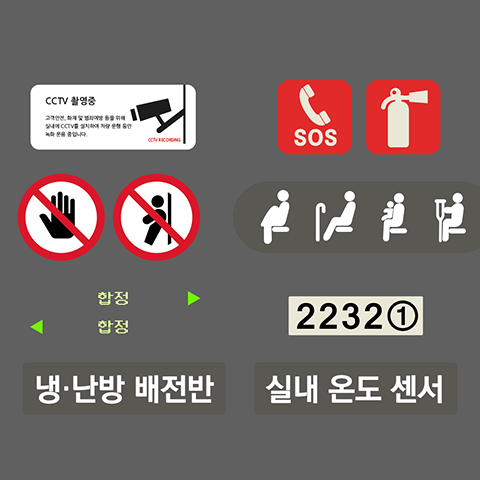
- Adding screws using the bolt factory add-on
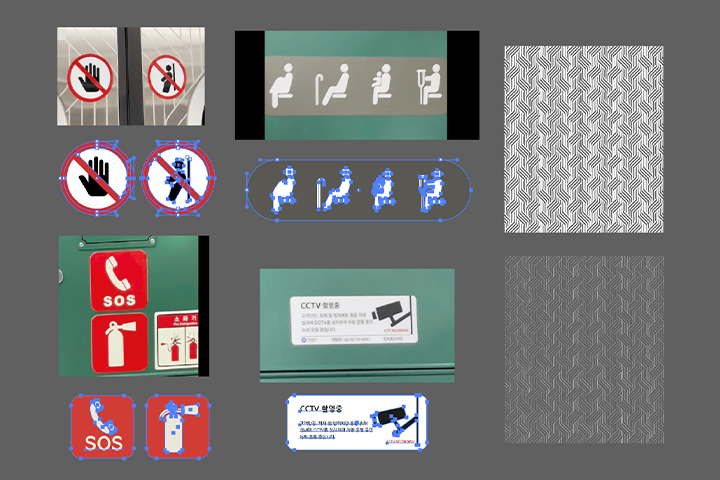
- Using the fire extinguisher asset
38. Create your own texture using an external program
- Create textures with Adobe Illustrator
- Create textures with Affinity Designer PC version
- Create textures with Affinity Designer iPad version
39. Applying external textures
- Texturing using external images
40. Add animation
- Configure the angle of the handle in various ways for a natural look
- Control multiple handles at once by setting a pattern
- Repeat actions using keyframe settings and NLA editor
- Simple expression of the background passing outside the subway
41. Final rendering
- Using a collection instance, configure the next column and express shaking
- Camera settings
- Render as an image rather than a video and then combine it into a video.
SECTION 08. Possibility of future development
42. Various add-ons you can utilize
- Platforms where you can purchase paid add-ons
- hard ops / box cutter
- fluent materializer
- random flow
- botaniq / traffiq
- ultimate clay shader
43. A good program to use with Blender
- Adobe After Effects for post-processing and VFX work
- Substance Painter capable of detailed texturing
- Unreal Engine 5 allows you to create a variety of real-time 3D content
interview
The story that Blender artist Dr. huchu wants to tell

Question.01
What is unique about this course?
What is unique about this course?
What sets us apart is that we go through the process together to create results that pursue ‘extreme detail.’ Once you understand the process of expressing the details by making them one by one, you will be able to easily learn how to express them more simply. You can think of it as a lecture that focuses on the process of producing results rather than on practical standards that emphasize efficiency.
Question.02
What is the planning intention or point of this lecture?
What is the planning intention or point of this lecture?
The intention of my project is to help you learn the basics step by step and improve your skills to the point where you can express the objects you want to make the way you want. Rather than suggesting that this method is the correct answer, the point seems to be, 'I approached it this way and that to make it this way, but these methods can also be used.'
Question.03
What do students who are not familiar with Blender modeling find most difficult?
What do students who are not familiar with Blender modeling find most difficult?
If you are not familiar with 3D, you may be at a loss as to how to create the shape you want or how to express the texture . In this class, we plan to solve these concerns together by covering through easy and fun step-by-step exercises how to easily express shapes by using which values in each function.
We will guide you through the program to use.
[essential]
-Blender 3.2.1 (Blender 3.0 or higher recommended)
[assistant]
-illustrator
-Affinity Designer PC version
- Affinity Designer iPad version
*Programs and materials are not provided separately.
*Auxiliary programs are optional, not required.
Even if you don't use it, there is no problem taking the course.
*To shorten render preview or final render time,
An RTX level or higher graphics card is recommended.
(Render preview and rendering are possible even if you do not have a graphics card or use a graphics card with low specifications, but it may take a long time.)