Coloso.

Search Input

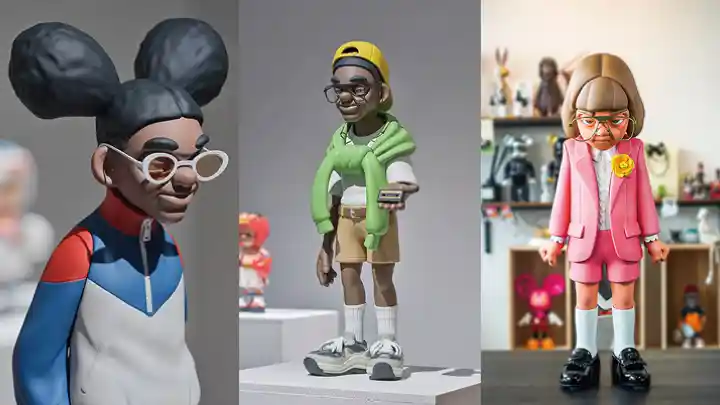
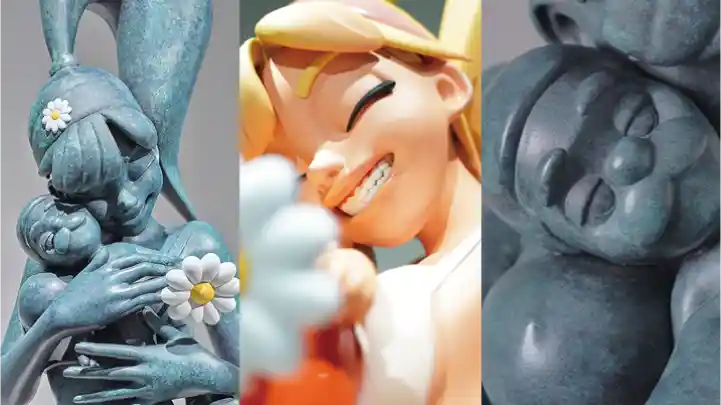
The Ultimate Roadmap to Creating Your Own 3D Art Toy

Art Toy ArtistTobey
  • Now Available


Class Details

  • Now Available
  • Basic~Advanced
  • Total 70 videos, 25Hours 6Minutes
  • Korean
  • English, Traditional Chinese [Auto]
  • Class materials included


[Dictionary]arttoyartist,tobey_KR Details

Curriculum
In-Depth Look

1st Release (Ch. 1 - Ch. 10) : 2025. 10. 29 (UTC-8)
2nd Release (Ch. 11 - Ch. 70) : 2025. 11. 26 (UTC-8)

**Class release dates and content are subject to change without prior notice.

  • Section 01
    Opening
    curriculum_3ddesign_tobey_section00_1.webp
    curriculum_3ddesign_tobey_section00_2.webp
    • 1. Orientation- Class overview and objectives

    • 2. Analyzing the Latest Trends- Analyzing trends in the global art toy market - Setting the direction of your work

  • Section 02
    ZBrush Basics
    curriculum-3ddesign-tobey-section01-1.webp
    curriculum-3ddesign-tobey-section01-2.webp
    curriculum-3ddesign-tobey-section01-3.webp
    curriculum-3ddesign-tobey-section01-4.webp
    • 3. The UI of ZBrush- Introduction to ZBrush menus - Familiarizing yourself with the interface

    • 4. Navigating Though ZBrush- Understanding the viewport and object control in ZBrush

    • 5. Sculpting Basics- Familiarizing yourself with basic sculpting tools - Learning basic modeling through sculpting

    • 6. Gizmo 3D Basics- The basics of using the Gizmo 3D - Moving, resizing, and rotating objects

    • 7. The Basics of Symmetry- How to use Symmetry for more efficient modeling

    • 8. Aligning Symmetry with Mirror and Weld- Duplicating and combining objects to create a symmetrical shape

    • 9. Managing Objects Using Subtools- The basics of using SubTools for more efficient management and editing of complex models - Understanding the structure of SubTools - Model management methods using SubTools

    • 10. Creating a Simple Character with Shapes- Creating a character’s form by combining basic shapes - Creating a simple character

  • Section 03
    Sketch Modeling
    curriculum-3ddesign-tobey-section02-1.webp
    curriculum-3ddesign-tobey-section02-2.webp
    curriculum-3ddesign-tobey-section02-3.webp
    curriculum-3ddesign-tobey-section02-4.webp
    • 11. Understanding the Concept of DynaMesh- Understanding the concept of DynaMesh, a tool for free-form sculpting - Changing the density and form of meshes - How to utilize DynaMesh

    • 12. Main Brush Types and Their Features- Understanding main brush types - The characteristics and usage of each brush

    • 13. Partial Modeling Using Masking- Understanding the concept of masking, a tool for selective protection and editing - Masking for more detailed editing - Practicing masking techniques and various ways to utilize them

    • 14. Select Editing Tools- Exploring efficient modeling tools for selecting and editing certain areas

    • 15. Cutting Objects- Exploring various crop tools for slicing and splitting forms in detail

    • 16. Efficient Object Management with Poly Groups- Understanding Polygroups, which make it easier to edit specific faces of complex models - How to optimize selection/editing through grouping

    • 17. Gizmo 3D Customization- Convenient ways to transform objects

    • 18. Body Design Basics- Building basic character body proportions - Shaping the overall body by adjusting and arranging objects

    • 19. Creating Coloso-Exclusive Character 1: Sketch Modeling of the Head- Visualizing the early concept of the work - Sketch modeling of the head

    • 20. Creating Coloso-Exclusive Character 2: Sketch Modeling of the Body- Shaping the body by adding shapes

    • 21. Creating Coloso-Exclusive Character 3: Sketch Modeling of Clothes- Conceptualizing the desired clothes by adding shapes

  • Section 04
    Advanced Modeling
    curriculum-3ddesign-tobey-section03-1.webp
    curriculum-3ddesign-tobey-section03-2.webp
    curriculum-3ddesign-tobey-section03-3.webp
    curriculum-3ddesign-tobey-section03-4.webp
    • 22. Understanding Division Modeling- Understanding the concept of division modeling, which gradually increases a model’s resolution while adding details

    • 23. The Division Modeling Process- Creating details through division modeling - Reinforcing detailed modeling skills

    • 24. DynaMesh vs. Division Modeling- Key differences between DynaMesh vs. Division Modeling - Understanding the basis for choosing each technique - Optimizing your work process

    • 25. Attaching Objects in Division Modeling- Natural and efficient methods for combining objects - Techniques for seamlessly connecting parts

    • 26. Creating the Hand 1- Modeling the basic shape of the character’s hand - Understanding hand modeling and basic sculpting

    • 27. Creating the Hand 2- Completing the detailed features and anatomy of the hand - Seamlessly connecting the fingers, back of the hand, and wrist

    • 28. Creating Simple Shapes Using the ShadowBox Feature- Creating simple object forms using masking - Converting logos and fonts into objects and incorporating them into your work

    • 29. Customizing ZBrush UI and Setting Shortcuts- Setting up the UI and shortcuts for user convenience - Improving workflow speed

    • 30. Tobey’s UI and Shortcut Guide- Customizing the UI and shortcuts based on features mainly used by Tobey

    • 31. Polygon Modeling with ZModeler- Understanding the basics of polygon modeling instead of sculpting - Learning commonly used ZModeler functions

    • 32. Understanding Curve Brushes- learning how to use main curve brushes - Creating various object shapes along drawn lines

    • 33. Creating New Objects on Surfaces Using the 'Extract' Function- Drawing on an object’s surface with masking to create new geometry

    • 34. Dynamic Subdivision 01- Utilizing one of ZBrush’s powerful features, Dynamic Subdivision

    • 35. Dynamic Subdivision 02- Exploring advanced uses of ZBrush’s Dynamic Subdivision feature

    • 36. Creating Clothes for Your Model- Making clothing using the 'Extract' function

    • 37. Recording Layers and Managing Modeling Progress- Efficiently recording each modeling stage with layer registration

    • 38. Creating Shoes- Making parts using the Extract function - Generating new components such as shoes

    • 39. Subtractive Modeling with 'Boolean'- Learning the essential Boolean function for art toy part creation

    • 40. Creating Joints for Model Assembly- Designing joints for separated model parts

    • 41. Applying Joint Creation- Studying real models to create practical joint structures

    • 42. Preparing for 3D Printing- Setting up your model for 3D printing output

    • 43. Creating a Coloso-Exclusive Character: Clean Modeling with Divide- Refining a sketch-modeled character using divide modeling

    • 44. Creating a Coloso-Exclusive Character: Advanced Clothing Design- Designing clothing using advanced modeling techniques

    • 45. Creating a Coloso-Exclusive Character: Making a Hat- Crafting hats through advanced modeling features

    • 46. Creating a Coloso-Exclusive Character: Making a Bag- Creating a bag using advanced modeling methods

    • 47. Creating a Coloso-Exclusive Character: Hand Posing- Modeling the hands and refining the overall body form

    • 48. Creating a Coloso-Exclusive Character: Making Shoes- Designing shoes that fit the sample character

  • Section 05
    Modeling Completion
    curriculum-3ddesign-tobey-section04-1.webp
    curriculum-3ddesign-tobey-section04-2.webp
    curriculum-3ddesign-tobey-section04-3.webp
    curriculum-3ddesign-tobey-section04-4.webp
    • 49. Creating a Coloso-Exclusive Character: Refining the Model- Refining details for the final modeling completion

    • 50. Creating a Coloso-Exclusive Character: Making a Can and Sleeve Folds- Creating a can and clothing sleeves using ZModeler

    • 51.Creating a Coloso-Exclusive Character: Making Clothing and Sock Folds- Learning folding techniques to add realistic details to the model

    • 52. Creating a Coloso-Exclusive Character: Attaching Hands, Making Bag Straps, and Grips- Attaching posed hand components to complete the model - Creating bag straps using the Curve Brush

    • 53. Creating a Coloso-Exclusive Character: Finalizing the Model- Completing and checking the model before parting design

  • Section 06
    Parting and Joint Design
    curriculum-3ddesign-tobey-section05-1.webp
    curriculum-3ddesign-tobey-section05-2.webp
    curriculum-3ddesign-tobey-section05-3.webp
    curriculum-3ddesign-tobey-section05-4.webp
    • 54. Creating a Coloso-Exclusive Character: Modeling Parting 1- Dividing the completed model into assembly-ready parts

    • 55. Creating a Coloso-Exclusive Character: Modeling Parting 2- Dividing the completed model into assembly-ready parts

    • 56. Creating a Coloso-Exclusive Character: Modeling Parting 3- Dividing the completed model into assembly-ready parts

    • 57. Creating a Coloso-Exclusive Character: Modeling Parting 4- Dividing the completed model into assembly-ready parts

    • 58. Creating a Coloso-Exclusive Character: Creating Joints 1- Adding joints to parted models to make them connectable

    • 59. Creating a Coloso-Exclusive Character: Creating Joints 2- Adding joints to parted models to make them connectable

    • 60. Creating a Coloso-Exclusive Character: Creating Joints 3- Adding joints to parted models to make them connectable

    • 61 Creating a Coloso-Exclusive Character: Creating Joints 4- Adding joints to parted models to make them connectable

    • 62. Creating a Coloso-Exclusive Character: Preparing for 3D Printing- Setting up the example model for 3D printing

  • Section 07
    The Work Process for Creating Physical Art Toys
    curriculum-3ddesign-tobey-section06-1.webp
    curriculum-3ddesign-tobey-section06-2.webp
    curriculum-3ddesign-tobey-section06-3.webp
    curriculum-3ddesign-tobey-section06-4.webp
    • 63. Creating a Coloso-Exclusive Character Post-Processing 01: Surface Polishing- Smoothing the surface of the printed art toy

    • 64. Creating a Coloso-Exclusive Character Post-Processing 02: Surface Surfacer Work- Removing minor flaws by applying surfacer on the surface - Ensuring that the work is in the best condition for painting

    • 65. Creating a Coloso-Exclusive Character Coloring 01: Applying Paint with an Airbrush- Airbrush techniques for more even and professional-looking painting

    • 66. Creating a Coloso-Exclusive Character Coloring 02: Brush Painting with Acrylics- Brush painting techniques using acrylic paint for a more detailed look

    • 67. Creating a Coloso-Exclusive Character Coloring 03: Finishing and Preservation with Clear Coats- How to protect the painting and improve its durability - How to apply a clear finish for the final texture

    • 68. Creating a Coloso-Exclusive Character: Bonding (Assembly)- Bonding techniques for solid, clean joining of multiple art toy parts

  • Section 08
    From Creator to Artist: Practical Branding
    curriculum-3ddesign-tobey-section07-1.webp
    curriculum-3ddesign-tobey-section07-2.webp
    • 69. Creating a Coloso-Exclusive Character: Using SNS – Instagram & Behance- Photographing and retouching tips to maximize the appeal of your work - Creating eye-catching images for the web

    • 70. Creating a Coloso-Exclusive Character: Soft Skills- Effective ways to promote your work on Instagram and Behance - Strategies for communicating with potential clients and coworkers

Recommended Classes

Important Notice

- This product provides access to the video lectures online (Excluding products categorized as Assets). - Under certain circumstances, discounts may end early or be extended without prior notice. - For pre-ordered courses, the content and the lecture videos will be released sequentially according to the schedule. The Course Start Date will be set to the release date of the first lecture video. - You will gain immediate access to the course through My Page upon completing registration and payment. Total Course Duration: - The Standard Access (Paid access) period lasts for the first 15 days and Unlimited Free Access period will begin from the 16th day. Both the Standard and Unlimited Free Access periods offer the equal viewing experience to the content. - Course Start Date: The estimation of the Course Start Date will be based on the completion date of the payment. Immediate access to the lecture videos will be granted through My Page. (For pre-ordered courses, the start date will be the release date of the first lecture video.) - In case the course start date is postponed due to extenuating circumstances on Coloso’s end, the start date will be adjusted accordingly.
*Please note that certain aspects of this course, including the release date, curriculum images, and associated content, are subject to change without prior notification.
*Would you like to learn more about our refund policy? Please check ▶ here
*Please check our ▶ FAQ for Copyright and Proprietary Rights, User-Generated Content, Security, and Violation information.
*保留未事前告知而更改本網頁資訊的權利
*欲進一步瞭解退款政策的細節,請由 ▶ 此處確認。
*請至 ▶FAQ頁面查看有關版權及所有權、使用者製作內容、資料安全及違反等相關資訊。
*Tenga en cuenta que la información de esta página está sujeta a cambios sin previo aviso.
* ¿Le gustaría saber más sobre nuestra política de reembolso? Por favor, compruebe ▶ aquí
*Por favor, compruebe nuestras ▶ FAQ para los derechos de autor y derechos de propiedad, contenido generado por el usuario, seguridad e información de violación.
- This product is strictly prohibited to resell, redistribute, steal, or transfer. - The original images and simple edited images of this product cannot be transferred, distributed, or sold. - This product can be refunded only before the class video is released. - You can find this product on [My Class] > [Class Materials]