[Course]illustrator,dojen Details
In-Depth Look
- SECTION 01
OT
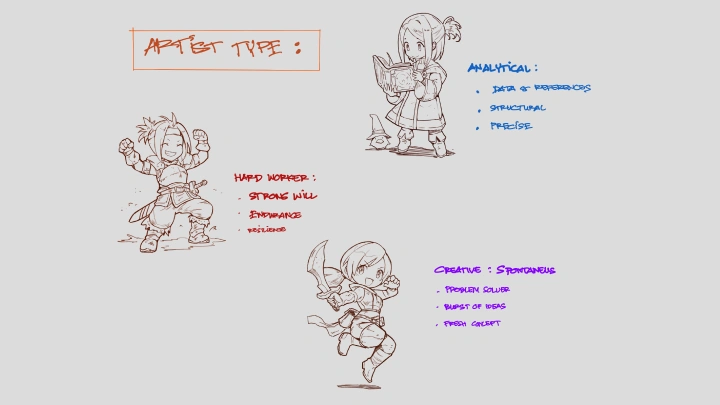
01. Orientation- Meet Your Instructor - Mind Concept (Learn to use instinct and work with your strengths and weaknesses) - Artist Types (Analytical Type, Hard Worker (Grinder), Creative Worker (Spontaneous)) - Technical Skills (Software, basic skills) - Outcome: Discover your unique style, build essential skills, and create with confidence
- SECTION 02
Basic
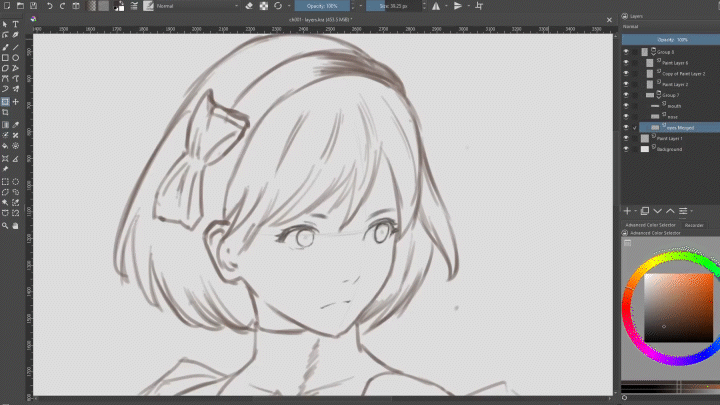

02. Using Layers as Try and Error- Exploring ideas freely and refining their work iteratively - Layer feature is the ultimate tool in digital painting; use it and think outside the box - Using layers to make face anatomy process easier and refine the layers below
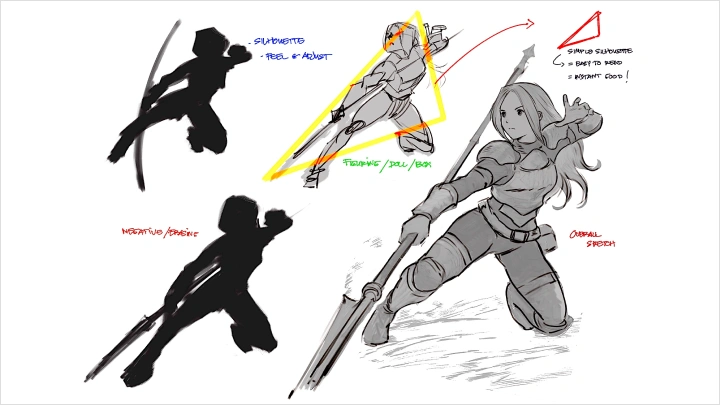
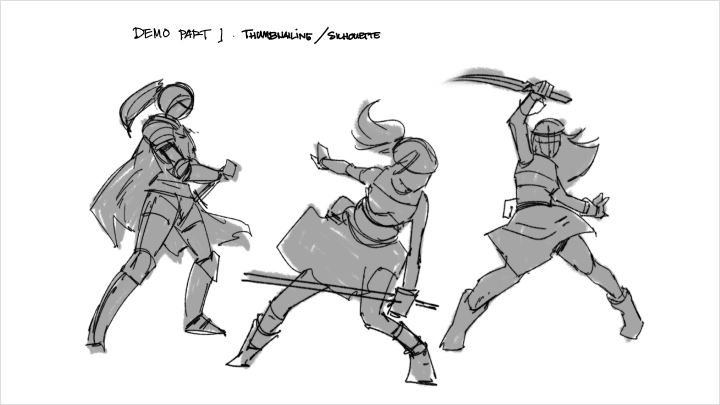
03. Silhouette- Straight to the creation process! - Using silhouettes to enhance your ability to communicate visually
04. Creating Object Using Lines from Silhouette- Transforming a silhouette into a detailed object or character using lines - Breaking down the silhouette, adding structure, and refining details to create the overall design
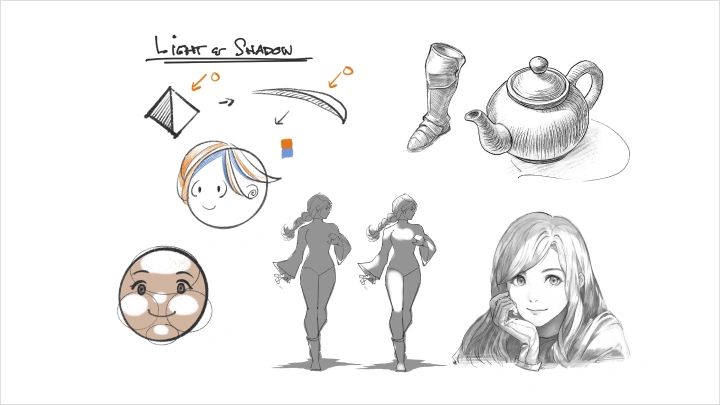
05. Light, Shadow and Rendering- Mastering light, shadow, and rendering to create dynamic, realistic, or stylized art - Step 1: Define the Light Source - Step 2: Block in Shadows - Step 3: Add Gradients and Blending - Step 4: Refine Details - Add highlights to the brightest areas (e.g., edges facing the light source) - Deepen shadows in areas farthest from the light or where objects overlap - Use texture brushes or patterns to add surface details (e.g., skin, fabric, or metal)
- SECTION 03
Technical Aspects
06. Mind Concept- Art isn’t just about following rules; sometimes it is about breaking them with purpose - By embracing trial and error, valuing uniqueness, prioritizing instinct, and maintaining a human touch
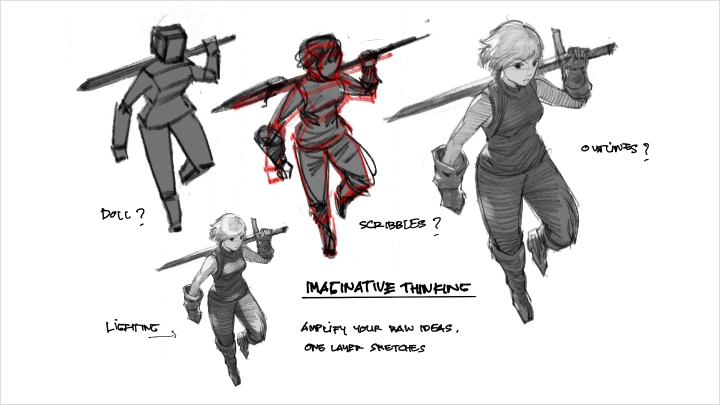
07. Basic Technique with Imaginative Thinking- Reducing technical complexity - Amplifying the rawness of their ideas - Inviting viewers to connect through shared human experiences
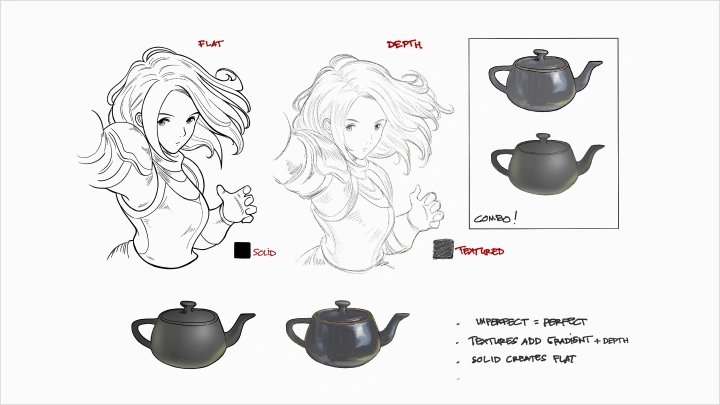
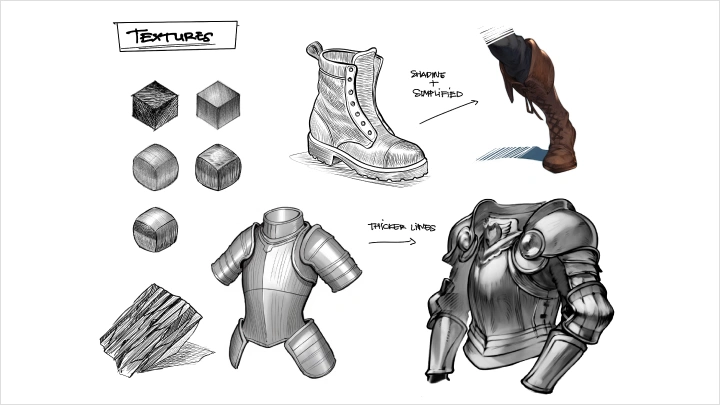
08. Texture and Hatching- Understanding different types of textures and mastering techniques like brush-work and hand-painting
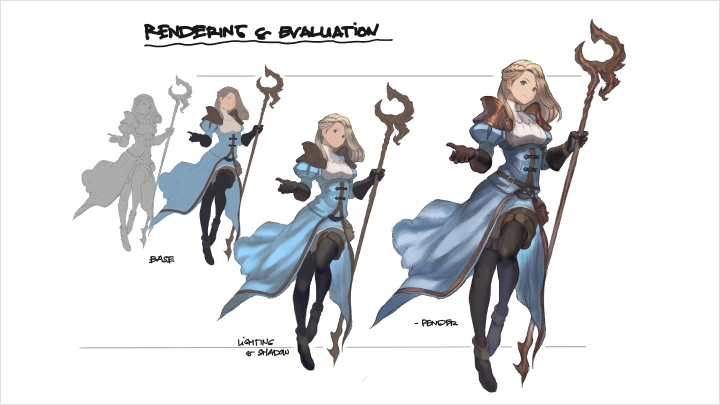
09. Rendering and Evaluation- Mastering techniques for adding depth, detail, and polish, and by critically assessing your work for consistency and quality
- SECTION 04
How to Draw Emotions
10. Designing Original Fantasy Characters- The difference between jrpg, dnd, and high fantasy - Backstory and role - Fantasy elements - Good vs bad design - Importance of cartoon - Proportions - How to line weight
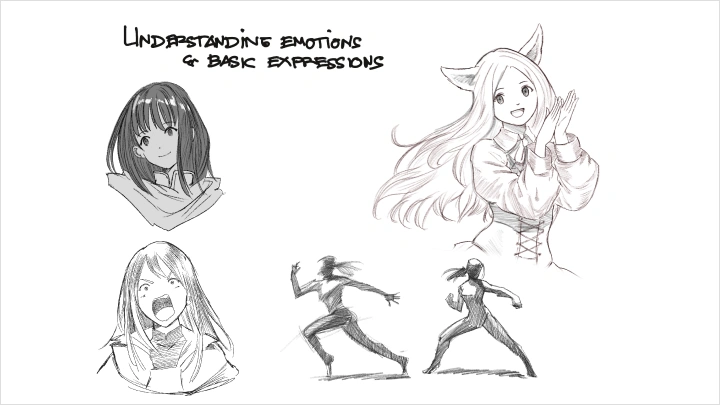
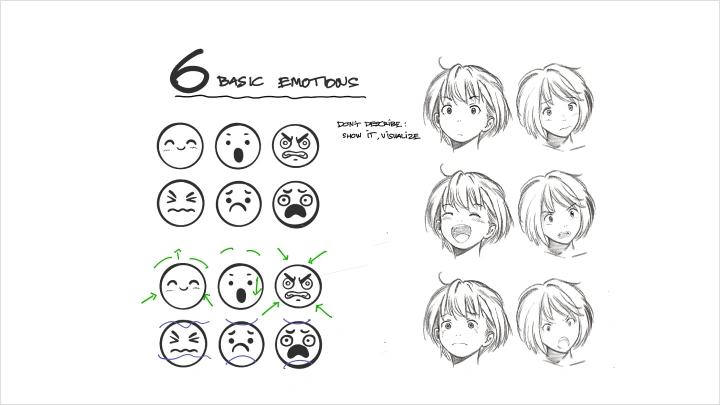
11. Six Basic Emotions- Capturing the nuances of human experience - Learning about facial features, practicing through observation and experimentation - Basic manga face structure
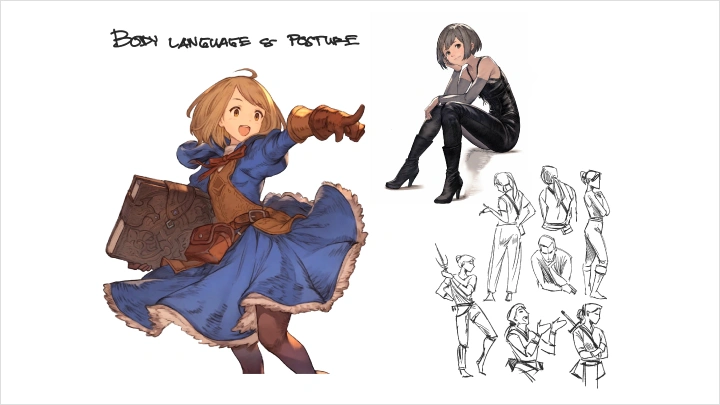
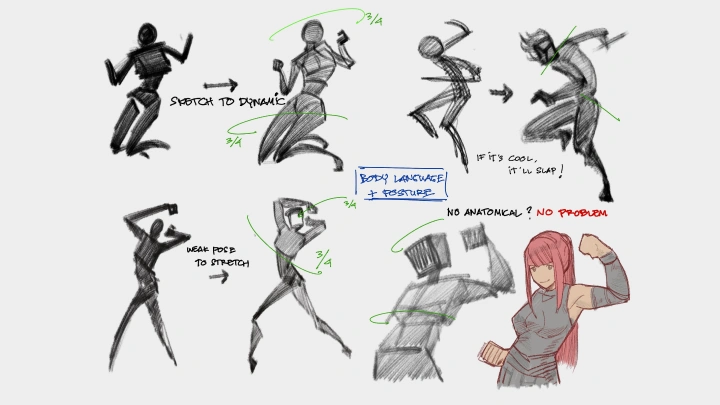
12. Body Language and Posture Transfer- Manipulating form, color, and context - Transforming static figures into storytellers - Static to dynamic and 3D model to 2D - Learning about micro gestures
13. Fabric, Hair, and Movement- Understanding their unique properties and how they interact - Creating dynamic, expressive, and visually compelling artwork - Foreshortening
- SECTION 05
Character Creation (Part 1)

14. Silhouette, Cleaning, and Line Weight- Breaking down Sylvia design - Identity, history, foreshadowing, visual accents, personality
15. Core of Appeal in Character Design- Establishing a strong, readable design and ensuring a dynamic composition from the start - Accent, where and how, is it necessary?
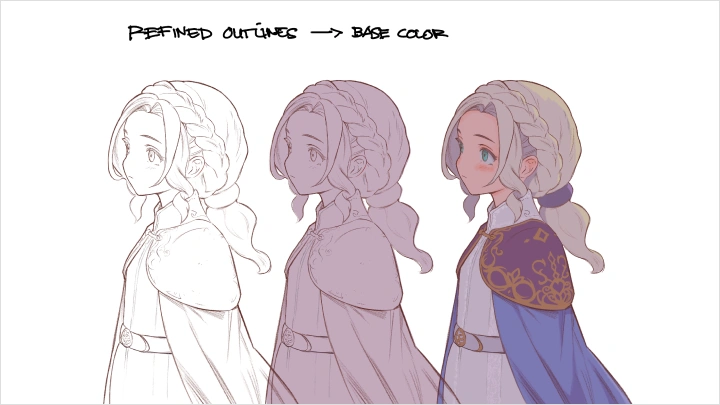
16. Refining and Cleaning the Sketch- Refine and clean the sketch - Refinement: Lighten the silhouette and sketch over it, defining key details like anatomy, clothing, and facial features while maintaining the strong initial shape. Adjust proportions and pose if needed - Clean: Go over the refined sketch with confident, controlled lines, removing unnecessary strokes and adding clarity. This stage ensures the sketch is readable and ready for rendering or inking
17. Base Color- Flat Colors: Filling in the main shapes with solid colors, usually starting with mid-tones - Layer Management: Keeping colors on separate layers (e.g., skin, hair, clothing) for easier adjustments - Lighting Consideration: Choosing base colors that work well with the intended lighting and mood of the piece
- SECTION 06
Character Creation (Part 2) - Rendering
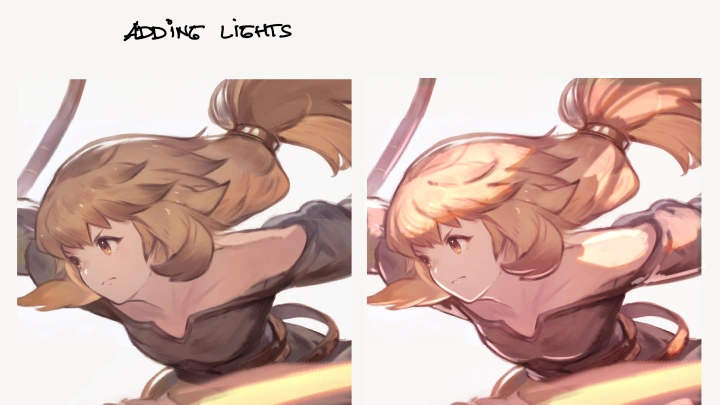
18. Adding Light- Choosing a Light Source: Determine the direction and intensity of the light (e.g., soft ambient, strong directional) - Blocking in Highlights: Use a soft or hard brush to apply lighter tones where light naturally hits, such as the top of the head, shoulders, and raised surfaces - Adjusting Blending: Depending on the style, blend the highlights softly for a smooth look or keep them sharp for a more stylized approach
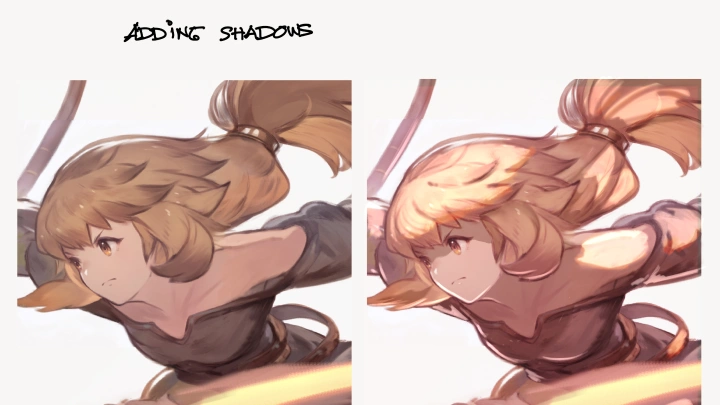
19. Adding Shadow- Determining Shadow Direction: Based on the light source, decide where shadows will fall. Shadows appear on the opposite side of the light - Blocking in Shadows: Use a slightly darker, desaturated version of the base color or a warm/cool tone depending on the scene’s mood. Soft or hard edges can be used based on the material and lighting conditions - Ambient Occlusion: Darken areas where light is least likely to reach, such as under the chin, inside folds of fabric, or where objects touch - Blending & Refinement: Adjust opacity and blending for a natural or stylized look
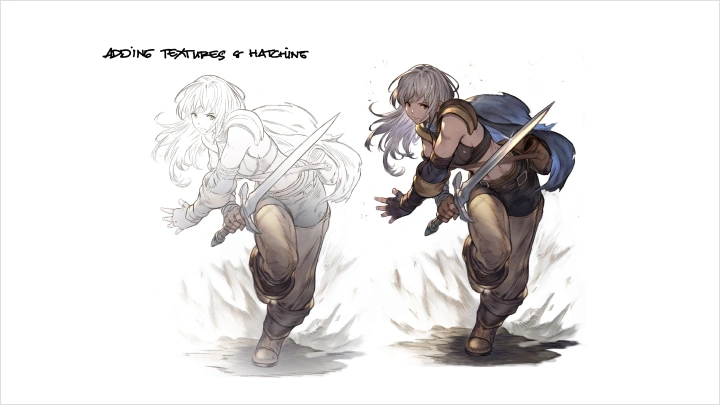
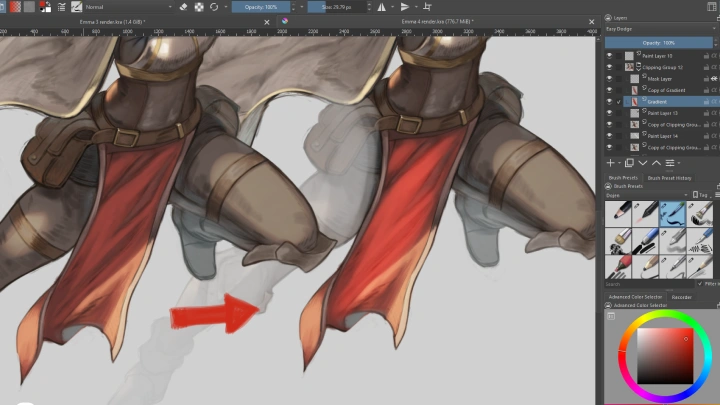
20. Adding Textures and Hatching- Textures: Use brushes or manual strokes to add material details like fabric grain, rough stone, or skin smoothness. This helps create a tactile feel - Hatching & Cross-Hatching: Apply lines to indicate shading, depth, or stylistic elements. Works well for a hand-drawn or comic-like effect - Layering & Blending: Adjust opacity, layer modes, or erase selectively to integrate textures naturally without overwhelming the base
21. Adding Gradients- Volume & form enhancement: Gradients can subtly reinforce the curvature of objects, making them feel more three-dimensional
22. Overpainting and Refining- Finalizing the artwork - Polishing the artwork by improving details, fixing inconsistencies, and enhancing visual appeal
- SECTION 07
Character Creation (Part 3) - Semi-Realistic Character

23. Jumping to Base Color- Stick to mid-tones—neither too bright nor too dark—to allow flexibility when adding light and shadow later - Choose colors that fit the mood, environment, and lighting of the scene - Adjust hues slightly to avoid overly flat or dull colors—subtle variations make the painting more organic
24. Adding Light and Shadow- Instead of following a strict process, try to feel out the shapes and adjust as you go - Start Loose: Lightly sketch in shadows where they feel natural - Think in 3D: Imagine your character as a real object in space Where would the light naturally hit? Where would shadows gather? - Push & Pull: Sometimes shadows will be too soft or too harsh—blend or sharpen them depending on the material Play with contrast to see what feels right - Bounce Light: Shadows aren’t always just dark—some areas catch reflected light from the environment, lets try adding a bit of warmth or coolness to the shadows for richness - Let It Breathe: If something looks too stiff, erase a bit, soften edges, or even add some texture within the shadows to break up the uniformity - There’s no single right way to do this—adjust, experiment, and trust your eye until it feels natural From here, we can add textures, gradients, and final refinements to bring it all together
25. Textures- Feeling where the surface needs more life and adding textures intuitively - Experimenting with brushes: Swap between rough, grainy, or painterly brushes—see what feels right for different surfaces - Breaking the smoothness: If an area looks too polished, lightly dab in some noise, hatching, or subtle texture to give it character - Think About Wear & Tear: Does this material get scratched, wrinkled, or scuffed over time? Try adding imperfections where it makes sense—edges of armor, folds in clothing, or a hint on skin - Don't Overdo It: Textures should enhance, not overwhelm. If it starts looking too busy, erase a bit or blur the details to keep the focus where it matters - Zoom In, Zoom Out: What looks great up close might be distracting from a distance. Keep stepping back to check the overall balance - Textures shouldn’t feel forced—let them emerge naturally as you work
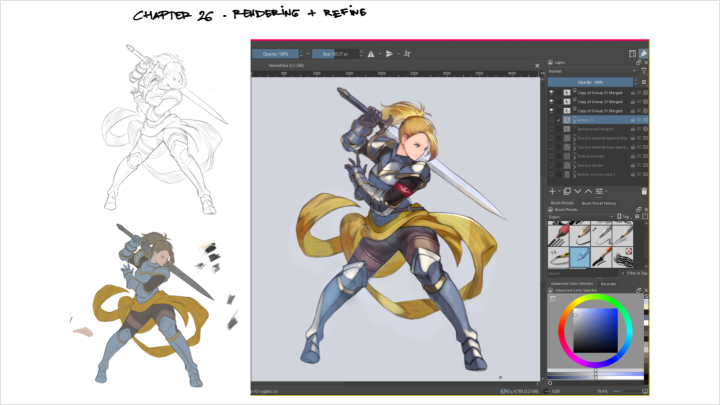
26. Rendering and Refining- Focusing on the overall composition and balance - Fixing What Feels Off: If something looks awkward, don’t be afraid to erase or repaint—even large sections - Check proportions and anatomy—does everything feel natural? Does the pose flow? - Adding the Last 5% - At this stage, it's all about intuition—polishing, adjusting, and trusting your artistic eye until it just feels done
- SECTION 08
Postscript
27. Outro- Advice on how to survive as an artist - Embrace challenges, think creatively, and enjoy the artistic process - Keep practicing, stay curious, and believe in your potential - To achieve growth and confidence as an artist, even when faced with technical or skill limitations